孔庆威的博客

精于心,简于形


  • 首页

  • 分类

  • 归档

  • 标签

【Kotlin】关于Android事件传递的整理

发表于 2018-04-03 |

关于事件传递的流程,已经有很多大神介绍过了,我在使用的过程中,也遇到了一些问题,在此整理一下,相信有不少同学也有遇到我这样的问题。

问题一:为什么我的onTouchEvent方法只响应了MotionEvent.ACTION_DOWN动作

百度或者Google一搜有一大把这样问题。其根本原因是你的MotionEvent.ACTION_DOWN行为没有被消费掉(没有return true),onTouchEvent默认MotionEvent.ACTION_DOWN为一个触摸事件的开始,如果MotionEvent.ACTION_DOWN没有做处理,则后面一系列行为将都不被响应。

举一个例子,有一个嵌套布局

  • A : ViewGroup
  • B : ViewGroup
  • C : View

注意,只有ViewGroup有onInterceptTouchEvent方法,View是没有onInterceptTouchEvent方法的,因为View不能再有子View,不涉及到事件传递

ViewA->ViewB->ViewC

当我们手指触摸C控件的时候,事件的传递过程为

  1. A - dispatchTouchEvent
  2. A - onInterceptTouchEvent
  3. B - dispatchTouchEvent
  4. B - onInterceptTouchEvent
  5. C - dispatchTouchEvent
  6. C - onTouchEvent
  7. B - onTouchEvent
  8. A - onTouchEvent

以上为 dispatchTouchEvent、onInterceptTouchEvent、onTouchEvent 均未重写的情况

默认情况下,你的ACTION_DOWN是没有被消费掉的,super.onTouchEvent(event)会返回false,比较常见的,有不少人会问,我手指触摸了C控件,但是为什么ACTION_MOVE和ACTION_UP没有响应呢,如果想要监听ACTION_MOVE和ACTION_UP,我们只需要重写C的onTouchEvent方法,在接收到MotionEvent.ACTION_DOWN的时候返回true,就代表这个触摸事件交给C处理了。

那么事件传递的过程将变成:

  1. A - dispatchTouchEvent
  2. A - onInterceptTouchEvent
  3. B - dispatchTouchEvent
  4. B - onInterceptTouchEvent
  5. C - dispatchTouchEvent
  6. C - onTouchEvent

就没有B、A 的onTouchEvent方法什么事了

问题二:手指在C控件上按下,我想要横着滑动的时候交给控件C处理,竖着滑动的时候交给B处理该如何实现

这里就涉及到事件的拦截处理,就轮到onInterceptTouchEvent方法大显身手的时候了。

首先聊一聊思路,我们都知道,事件的分发是由外到内的,即当我们在C控件上按下的时候,事件是先传到A上,A传给B,B再传给C(A -> B -> C)。事件处理是由内到外的,即C先处理,处理完再交给B,B处理完再交给A(C -> B -> A)。当前的需求涉及到B和C来处理滑动状态,那么,我们就可以在滑动事件分发到B的时候判断一下,当前的滑动是横向滑动的还是纵向滑动的:

  1. 如果是横向滑动的,那么onInterceptTouchEvent方法不做拦截,允许事件传到C,C接收到事件后,在onTouchEvent中将事件消费掉,这样B就不需要进行处理(不会接收到onTouchEvent的响应)。
  2. 如果是纵向滑动的,那么onInterceptTouchEvent就可以返回true,将事件拦截下来(不需要交给C处理,C就不会收的onTouchEvent的响应),B自己在onTouchEvent中将事件消费掉。

举个栗子

现在我们想实现这样一个功能,在页面上下滑动可以翻页,在控件上左右滑动可以拦截翻页动作
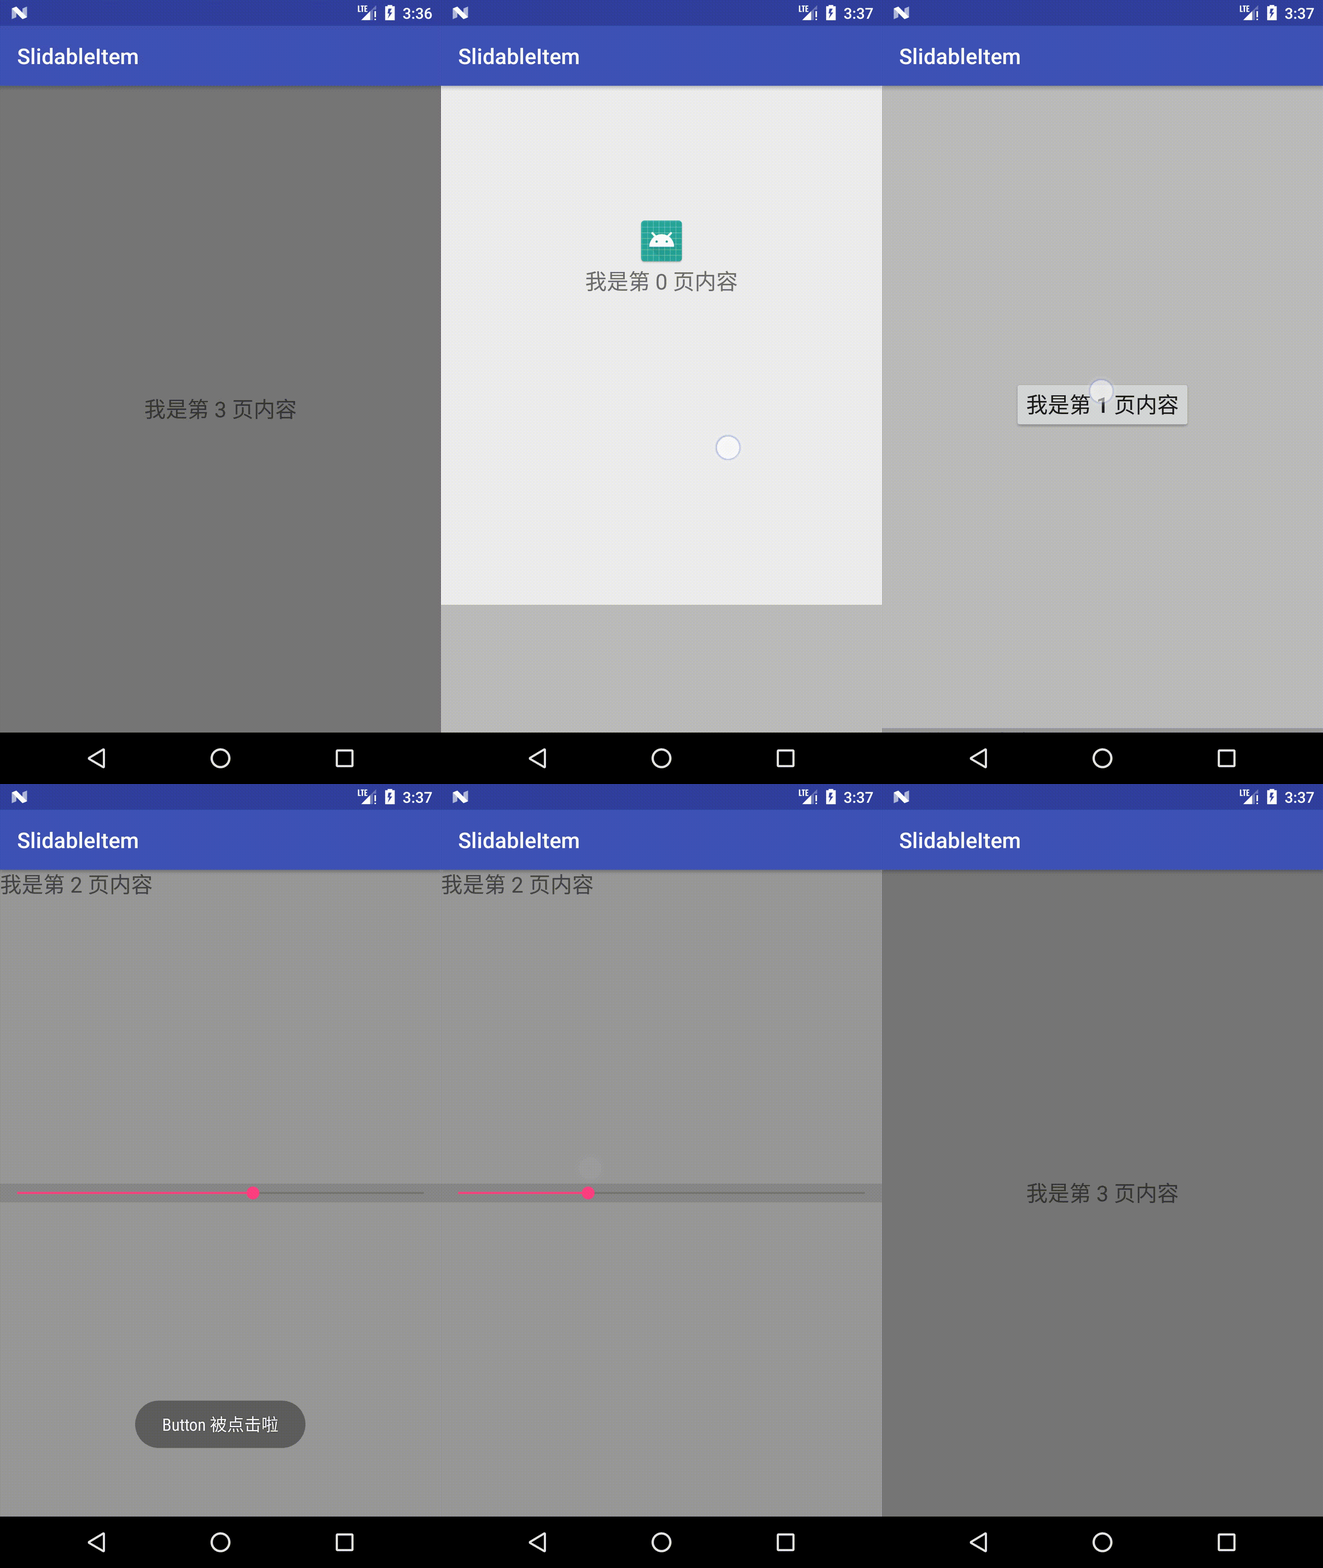
这里写图片描述

思路:

首先要写布局,自定义个 View 继承 ViewGroup, 然后开始我们的xml布局

1
2
3
4
5
6
7
8
9
10
11
12
13
14
15
16
17
18
19
20
21
22
23
24
25
26
27
28
29
30
31
32
33
34
35
36
37
38
39
40
41
42
43
44
45
46
47
48
49
50
51
52
53
54
55
56
57
58
59
60
61
62
63
64
65
66
67
68
69
70
71
72
<com.kongqw.view.ScrollViewPager
android:layout_width="match_parent"
android:layout_height="match_parent">
<RelativeLayout
android:layout_width="match_parent"
android:layout_height="match_parent"
android:background="#FFEEEEEE">
<TextView
android:id="@+id/tv1"
android:layout_width="wrap_content"
android:layout_height="wrap_content"
android:layout_centerInParent="true"
android:gravity="center"
android:text="我是第 0 页内容"
android:textSize="20sp" />
<ImageView
android:layout_width="wrap_content"
android:layout_height="wrap_content"
android:layout_above="@id/tv1"
android:layout_centerInParent="true"
android:src="@mipmap/ic_launcher" />
</RelativeLayout>
<RelativeLayout
android:layout_width="match_parent"
android:layout_height="match_parent"
android:background="#FFBBBBBB">
<Button
android:id="@+id/btn_test"
android:layout_width="wrap_content"
android:layout_height="wrap_content"
android:layout_centerInParent="true"
android:gravity="center"
android:text="我是第 1 页内容"
android:textSize="20sp" />
</RelativeLayout>
<RelativeLayout
android:layout_width="match_parent"
android:layout_height="match_parent"
android:background="#FF999999">
<TextView
android:layout_width="wrap_content"
android:layout_height="wrap_content"
android:gravity="center"
android:text="我是第 2 页内容"
android:textSize="20sp" />
<SeekBar
android:layout_width="match_parent"
android:layout_height="wrap_content"
android:layout_centerInParent="true"
android:background="#FF888888" />
</RelativeLayout>
<TextView
android:layout_width="match_parent"
android:layout_height="match_parent"
android:background="#FF777777"
android:gravity="center"
android:text="我是第 3 页内容"
android:textSize="20sp" />
</com.kongqw.view.ScrollViewPager>

写完布局我们要重写onMeasure和onLayout方法,开始对布局测量、排布。
我们这里是纵向排布。

1
2
3
4
5
6
7
8
9
10
11
12
13
14
15
16
17
18
19
20
21
22
23
24
/**
* 测量
*/
override fun onMeasure(widthMeasureSpec: Int, heightMeasureSpec: Int) {
super.onMeasure(widthMeasureSpec, heightMeasureSpec)
for (index in 0 until childCount) {
measureChild(getChildAt(index), widthMeasureSpec, heightMeasureSpec)
}
}
/**
* 布局 纵向布局
*/
override fun onLayout(changed: Boolean, l: Int, t: Int, r: Int, b: Int) {
var top = 0
var bottom = 0
for (index in 0 until childCount) {
val childView = getChildAt(index)
bottom = top + childView.measuredHeight
childView.layout(0, top, childView.measuredWidth, bottom)
top = bottom
}
mBottomBorder = bottom
}

写到这里运行程序,应该是可以看得到第一个页面了,但是滑动没有任何反应,我们需要重写onTouchEvent方法,让View可以根据手指的滑动而滚动,这里需要监听event的ACTION_DOWN、ACTION_MOVE、ACTION_UP、ACTION_CANCEL状态,通过ACTION_MOVE记录手指每次纵向移动的距离,在监听到ACTION_UP、ACTION_CANCEL的时候,判断滑动位置,然后滚动到哪个页面。这样,一个简单的页面滑动就实现了。

scrollBy、scrollTo

提到滚动,就不得不提到两个方法,scrollBy和scrollTo,值得注意的是,通常我们一种面向对象的思想,想让谁滚动,谁就调用自己的scroll就行了,但是,这里的scrollBy和scrollTo针对的是自己子View的运动,说白话了,就是老爸要管理儿子运动的。
scrollBy是控制一次滚动多少,scrollTo是控制滚动到哪里。

我们这里自定义了ScrollViewPager,页面内容都写在ScrollViewPager内部,所以,我们控制滚动,就是在控制ScrollViewPager内部的子View滚动,所以,直接调用scrollBy和scrollTo即可。

Scroller

现在滑动没有问题了,但是手指一松开,View 会瞬间移动到指定位置,体验不太好,我们想要View的滚动有一个顺滑的过程,这就又不得不再提到一个Scroller类,他可以帮助我们完成动画的平缓过度。

通过Scroller的startScroll来初始化运动的起始位置、结束位置和运动时间,然后调用invalidate()开始处理,这里会一直回调View的computeScroll方法,是一个空方法,需要我们自己在这里自己依据Scroller的computeScrollOffset()判断移动是否完成,然后调用scrollTo来完成平滑移动处理。

到这里,View就可以实现上下滑动,并平滑过渡了,接下来来处理事件的分发问题。
我们想要实现的目标是,当我们上下滑动的时候,可以滚动页面,要将事件拦截。
当我们在子控件上左右滑动的时候,可以将事件先交给子控件处理。那么我们就可以重写ScrollViewPager的onInterceptTouchEvent方法,在ACTION_MOVE的时候判断滑动方向,如果是上下滑动,则返回true,将事件拦截即可。

下面是自定义ScrollViewPager源码(Kotlin代码):

1
2
3
4
5
6
7
8
9
10
11
12
13
14
15
16
17
18
19
20
21
22
23
24
25
26
27
28
29
30
31
32
33
34
35
36
37
38
39
40
41
42
43
44
45
46
47
48
49
50
51
52
53
54
55
56
57
58
59
60
61
62
63
64
65
66
67
68
69
70
71
72
73
74
75
76
77
78
79
80
81
82
83
84
85
86
87
88
89
90
91
92
93
94
95
96
97
98
99
100
101
102
103
104
105
106
107
108
109
110
111
112
113
114
115
116
117
118
119
120
121
122
123
124
125
126
127
128
129
130
131
132
133
134
135
136
137
138
139
140
141
142
143
144
145
146
147
148
149
150
151
152
153
154
155
156
157
158
159
160
161
162
163
164
165
166
167
168
169
170
171
172
173
174
175
176
177
178
179
180
181
182
183
184
185
186
187
188
189
190
191
192
193
194
195
196
197
198
199
200
201
202
203
204
205
206
207
208
209
210
211
212
213
214
215
216
217
218
219
220
221
222
223
224
225
226
227
228
229
230
231
232
233
234
235
236
237
238
239
package com.kongqw.view.ScrollViewPager
import android.annotation.SuppressLint
import android.content.Context
import android.util.AttributeSet
import android.util.Log
import android.view.MotionEvent
import android.view.ViewConfiguration
import android.view.ViewGroup
import android.widget.Scroller
/**
* Created by Kongqw on 2018/3/29.
* ScrollViewPager
*/
class ScrollViewPager(context: Context?, attrs: AttributeSet?) : ViewGroup(context, attrs) {
/**
* 手指按下位置
*/
private var mDownX = 0.0F
private var mDownY = 0.0F
/**
* 手指移动后的位置
*/
private var mMoveX = 0.0F
private var mMoveY = 0.0F
/**
* 手指最后移动位置
*/
private var mLastX = 0.0F
private var mLastY = 0.0F
/**
* View 上边界
*/
private val mTopBorder = 0
/**
* View 下边界
*/
private var mBottomBorder = 0
/**
* 滑动处理
*/
private val mScroller: Scroller = Scroller(context)
/**
* 事件是否拦截
*/
private var isIntercept = false
/**
* 最小移动单位
*/
private val mScaledtouchslop = ViewConfiguration.get(context).scaledTouchSlop
companion object {
private val TAG: String = ScrollViewPager::class.java.simpleName
}
/**
* 测量
*/
override fun onMeasure(widthMeasureSpec: Int, heightMeasureSpec: Int) {
super.onMeasure(widthMeasureSpec, heightMeasureSpec)
for (index in 0 until childCount) {
Log.i(TAG, "测量第 $index 个控件大小")
measureChild(getChildAt(index), widthMeasureSpec, heightMeasureSpec)
}
}
/**
* 布局 纵向布局
*/
override fun onLayout(changed: Boolean, l: Int, t: Int, r: Int, b: Int) {
var top = 0
var bottom = 0
for (index in 0 until childCount) {
val childView = getChildAt(index)
bottom = top + childView.measuredHeight
Log.i(TAG, "布局第几个View [0, ${top}, ${childView.measuredWidth}, ${bottom}]")
childView.layout(0, top, childView.measuredWidth, bottom)
top = bottom
}
mBottomBorder = bottom
Log.i(TAG, "View 高度 $height")
}
override fun onInterceptTouchEvent(ev: MotionEvent?): Boolean {
val touchX = ev?.rawX
val touchY = ev?.rawY
when (ev?.action) {
MotionEvent.ACTION_DOWN -> {
mDownX = touchX!!
mDownY = touchY!!
isIntercept = false
}
MotionEvent.ACTION_MOVE -> {
mMoveX = touchX!!
mMoveY = touchY!!
val dx = Math.abs(mMoveX - mDownX)
val dy = Math.abs(mMoveY - mDownY)
// if(dy > dx){
// isIntercept = true
// }
isIntercept = (dy > dx)
}
MotionEvent.ACTION_UP, MotionEvent.ACTION_CANCEL -> {
isIntercept = false
}
}
mLastX = touchX!!
mLastY = touchY!!
return isIntercept
// return super.onInterceptTouchEvent(ev)
}
@SuppressLint("ClickableViewAccessibility")
override fun onTouchEvent(event: MotionEvent?): Boolean {
val touchY = event?.rawY
when (event?.action) {
MotionEvent.ACTION_DOWN -> {
Log.i(TAG, "ACTION_DOWN")
// 获取手指按下的位置
mDownY = touchY!!
return true
}
MotionEvent.ACTION_MOVE -> {
Log.i(TAG, "ACTION_MOVE")
// 获取手指移动后的位置
mMoveY = touchY!!
// 计算手指在Y轴移动距离
// val dY = Math.abs(mLastY - mDownY)
val dY = mLastY - mMoveY
when {
scrollY < mTopBorder -> {
// 向下已经划出上边界
Log.i(TAG, "向下已经划出上边界")
scrollBy(0, dY.toInt() / 5)
}
scrollY + height > mBottomBorder -> {
// 向上已经划出下边界
Log.i(TAG, "向上已经划出下边界")
scrollBy(0, dY.toInt() / 5)
}
else -> {
// 移动
scrollBy(0, dY.toInt())
}
}
// 刷新页面
invalidate()
mLastY = mMoveY
}
MotionEvent.ACTION_UP, MotionEvent.ACTION_CANCEL -> {
Log.i(TAG, "ACTION_UP View 纵向滑动了 $scrollY")
when {
scrollY <= mTopBorder -> {
// 向下已经划出上边界
Log.i(TAG, "向下已经划出上边界")
mScroller.startScroll(0, scrollY, 0, -scrollY)
invalidate()
}
scrollY + height >= mBottomBorder -> {
// 向上已经划出下边界
Log.i(TAG, "向上已经划出下边界")
val dy = mBottomBorder - scrollY - height
mScroller.startScroll(0, scrollY, 0, dy)
invalidate()
}
else -> {
// 移动
val page = computePageByScrollY(scrollY)
Log.i(TAG, "滑动到第 $page 页")
mScroller.startScroll(0, scrollY, 0, height * page - scrollY)
invalidate()
}
}
}
}
mLastY = touchY!!
return super.onTouchEvent(event)
}
override fun setOnTouchListener(l: OnTouchListener?) {
super.setOnTouchListener(l)
}
/**
* 重写平滑移动处理逻辑
*/
override fun computeScroll() {
super.computeScroll()
if (mScroller.computeScrollOffset()) {
// 滑动还没有结束
scrollTo(mScroller.currX, mScroller.currY)
invalidate()
}
}
/**
* 根据Y轴滑动距离判断应该显示哪一页
*/
private fun computePageByScrollY(scrollY: Int = 0): Int {
val v = scrollY / (height / 2)
Log.i(TAG, "computePageByScrollY scrollY = $scrollY v = $v")
return when (v) {
0 -> 0
1, 2 -> 1
3, 4 -> 2
5, 6, 7 -> 3
else -> 0
}
}
}

从Java到Kotlin——方法

发表于 2018-03-07 |

无参数、无返回值

1
2
3
fun hello() {
println("Hello, World!")
}

Java

1
2
3
public void hello() {
System.out.print("Hello, World!");
}

带参数、无返回值

1
2
3
fun hello(name: String) {
println("Hello, $name!")
}

Java

1
2
3
public void hello(String name){
System.out.print("Hello, " + name + "!");
}

参数带有默认值

1
2
3
fun hello(name: String = "World") {
println("Hello, $name!")
}

Java

1
2
3
4
5
6
7
public void hello(String name) {
if (name == null) {
name = "World";
}
System.out.print("Hello, " + name + "!");
}

带返回值

1
2
3
fun hasItems() : Boolean {
return true
}

Java

1
2
3
public boolean hasItems() {
return true;
}

简写

1
fun cube(x: Double) : Double = x * x * x

Java

1
2
3
public double cube(double x) {
return x * x * x;
}

传入数组

1
fun sum(vararg x: Int) { }

Java

1
public int sum(int... numbers) { }

主函数/Main方法

1
fun main(args: Array<String>) { }

Java

1
2
3
public class MyClass {
public static void main(String[] args){ }
}

多个参数

1
2
3
4
5
fun main(args: Array<String>) {
openFile("file.txt", readOnly = true)
}
fun openFile(filename: String, readOnly: Boolean) : File { }

Java

1
2
3
4
5
public static void main(String[]args){
openFile("file.txt", true);
}
public static File openFile(String filename, boolean readOnly) { }

可选参数

1
2
3
4
5
6
7
8
9
10
11
12
13
fun main(args: Array<String>) {
createFile("file.txt")
createFile("file.txt", true)
createFile("file.txt", appendDate = true)
createFile("file.txt", true, false)
createFile("file.txt", appendDate = true, executable = true)
createFile("file.txt", executable = true)
}
fun createFile(filename: String, appendDate: Boolean = false, executable: Boolean = false): File { }

Java

1
2
3
4
5
6
7
8
9
10
11
12
13
14
15
16
17
public static void main(String[]args){
createFile("file.txt");
createFile("file.txt", true);
createFile("file.txt", true, false);
createExecutableFile("file.txt");
}
public static File createFile(String filename) { }
public static File createFile(String filename, boolean appendDate) { }
public static File createFile(String filename, boolean appendDate, boolean executable) { }
public static File createExecutableFile(String filename) { }

泛型

1
2
3
4
5
6
fun init() {
val module = createList<String>("net")
val moduleInferred = createList("net")
}
fun <T> createList(item: T): List<T> { }

Java

1
2
3
4
5
public void init() {
List<String> moduleInferred = createList("net");
}
public <T> List<T> createList(T item) { }

从Java到Kotlin——基础语法

发表于 2018-02-27 |

Print输出

1
2
print("Hello, World!")
println("Hello, World!")

Java

1
2
System.out.print("Hello, World!");
System.out.println("Hello, World!");

常量

1
2
val x: Int
val y = 1

Java

1
2
final int x;
final int y = 1;

变量

1
2
3
4
var w: Int
var z = 2
z = 3
w = 1

Java

1
2
3
4
int w;
int z = 2;
z = 3;
w = 1;

可空变量

1
2
3
4
5
6
7
val name: String? = null
var lastName: String?
lastName = null
var firstName: String
firstName = null // Compilation error!!

Java

1
2
3
final String name = null;
String lastName;
lastName = null

空值检查

1
2
3
val length = text?.length
val length = text!!.length // NullPointerException if text == null

Java

1
2
3
if(text != null){
int length = text.length();
}

String

1
2
3
4
val name = "John"
val lastName = "Smith"
val text = "My name is: $name $lastName"
val otherText = "My name is: ${name.substring(2)}"

Java

1
2
3
4
String name = "John";
String lastName = "Smith";
String text = "My name is: " + name + " " + lastName;
String otherText = "My name is: " + name.substring(2);

三元运算符

1
2
3
val text = if (x > 5)
"x > 5"
else "x <= 5"

Java

1
String text = x > 5 ? "x > 5" : "x <= 5";

位运算

1
2
3
4
5
val andResult = a and b
val orResult = a or b
val xorResult = a xor b
val rightShift = a shr 2
val leftShift = a shl 2

Java

1
2
3
4
5
final int andResult = a & b;
final int orResult = a | b;
final int xorResult = a ^ b;
final int rightShift = a >> 2;
final int leftShift = a << 2;

is/as/in

1
2
3
4
5
if (x is Int) { }
val text = other as String
if (x in 0..10) { }

Java

1
2
3
if(x instanceof Integer){ }
final String text = (String) other;
if(x >= 0 && x <= 10 ){}

when

1
2
3
4
5
6
7
8
9
10
11
12
13
14
15
val x = // value
val xResult = when (x) {
0, 11 -> "0 or 11"
in 1..10 -> "from 1 to 10"
!in 12..14 -> "not from 12 to 14"
else -> if (isOdd(x)) { "is odd" } else { "otherwise" }
}
val y = // value
val yResult = when {
isNegative(y) -> "is Negative"
isZero(y) -> "is Zero"
isOdd(y) -> "is odd"
else -> "otherwise"
}

Java

1
2
3
4
5
6
7
8
9
10
11
12
13
14
15
16
17
18
19
20
21
22
23
24
25
26
27
28
29
30
31
32
33
34
35
36
37
38
39
40
41
42
final int x = // value;
final String xResult;
switch (x){
case 0:
case 11:
xResult = "0 or 11";
break;
case 1:
case 2:
//...
case 10:
xResult = "from 1 to 10";
break;
default:
if(x < 12 && x > 14) {
xResult = "not from 12 to 14";
break;
}
if(isOdd(x)) {
xResult = "is odd";
break;
}
xResult = "otherwise";
}
final int y = // value;
final String yResult;
if(isNegative(y)){
yResult = "is Negative";
} else if(isZero(y)){
yResult = "is Zero";
}else if(isOdd(y)){
yResult = "is Odd";
}else {
yResult = "otherwise";
}

for

1
2
3
4
5
6
7
8
for (i in 1 until 11) { }
for (i in 1..10 step 2) {}
for (item in collection) {}
for ((index, item) in collection.withIndex()) {}
for ((key, value) in map) {}

Java

1
2
3
4
5
6
7
for (int i = 1; i < 11 ; i++) { }
for (int i = 1; i < 11 ; i+=2) { }
for (String item : collection) { }
for (Map.Entry<String, String> entry: map.entrySet()) { }

集合

1
2
3
4
5
val numbers = listOf(1, 2, 3)
val map = mapOf(1 to "One",
2 to "Two",
3 to "Three")

Java

1
2
3
4
5
6
7
8
9
10
11
12
13
14
final List<Integer> numbers = Arrays.asList(1, 2, 3);
final Map<Integer, String> map = new HashMap<Integer, String>();
map.put(1, "One");
map.put(2, "Two");
map.put(3, "Three");
// Java 9
final List<Integer> numbers = List.of(1, 2, 3);
final Map<Integer, String> map = Map.of(1, "One",
2, "Two",
3, "Three");

forEach

1
2
3
numbers.forEach {
println(it)
}

Java

1
2
3
for (int number : numbers) {
System.out.println(number);
}

filter

1
2
numbers.filter { it > 5 }
.forEach { println(it) }

Java

1
2
3
4
5
for (int number : numbers) {
if(number > 5) {
System.out.println(number);
}
}

groupBy

1
2
3
val groups = numbers.groupBy {
if (it and 1 == 0) "even" else "odd"
}

Java

1
2
3
4
5
6
7
8
9
10
11
12
13
14
15
16
17
18
19
20
21
22
23
final Map<String, List<Integer>> groups = new HashMap<>();
for (int number : numbers) {
if((number & 1) == 0){
if(!groups.containsKey("even")){
groups.put("even", new ArrayList<>());
}
groups.get("even").add(number);
continue;
}
if(!groups.containsKey("odd")){
groups.put("odd", new ArrayList<>());
}
groups.get("odd").add(number);
}
// or
Map<String, List<Integer>> groups = items.stream().collect(
Collectors.groupingBy(item -> (item & 1) == 0 ? "even" : "odd")
);

partition

1
val (evens, odds) = numbers.partition { it and 1 == 0 }

Java

1
2
3
4
5
6
7
8
9
final List<Integer> evens = new ArrayList<>();
final List<Integer> odds = new ArrayList<>();
for (int number : numbers){
if ((number & 1) == 0) {
evens.add(number);
}else {
odds.add(number);
}
}

sortedBy

1
2
val users = getUsers()
users.sortedBy { it.lastname }

Java

1
2
3
4
5
6
7
8
9
10
11
final List<User> users = getUsers();
Collections.sort(users, new Comparator<User>(){
public int compare(User user, User otherUser){
return user.lastname.compareTo(otherUser.lastname);
}
});
// or
users.sort(Comparator.comparing(user -> user.lastname));

Android屏幕适配

发表于 2017-11-06 |

老文章了,拿到个人站里。

生成适配文件,我们先创建工具类,通过工具类直接生成适配文件,放到工程中即可。

工具类

下面工具类中,列举了10余种屏幕尺寸,如果有特殊分辨率需要适配,在main方法中添加即可。

设计师标注通常会以某个尺寸为基准标注一套尺寸,下面工具类以 720 * 1280 分辨率为基准,实际开发过程中,与设计师保持一致即可。

MakeXml.java

1
2
3
4
5
6
7
8
9
10
11
12
13
14
15
16
17
18
19
20
21
22
23
24
25
26
27
28
29
30
31
32
33
34
35
36
37
38
39
40
41
42
43
44
45
46
47
48
49
50
51
52
53
54
55
56
57
58
59
60
61
62
63
64
65
66
67
68
69
70
71
72
73
74
75
76
77
78
79
80
81
82
83
84
85
86
87
88
89
import java.io.File;
import java.io.FileNotFoundException;
import java.io.FileOutputStream;
import java.io.PrintWriter;
/**
* Created by kongqw on 2015/11/21.
*/
public class MakeXml {
// Mac路径
private final static String rootPath = "layoutroot/values-{0}x{1}/";
// Windows 路径
// private final static String rootPath = "C:\\layoutroot\\values-{0}x{1}\\";
/**
* 设置基准分辨率
* 一般标注按照多大的图标,这里我们就设置多大尺寸
*/
private final static float dw = 720f;
private final static float dh = 1280f;
private final static String WTemplate = "<dimen name=\"x{0}\">{1}px</dimen>\n";
private final static String HTemplate = "<dimen name=\"y{0}\">{1}px</dimen>\n";
// 手机分辨率
public static void main(String [] args){
makeString(320, 480);
makeString(480, 800);
makeString(480, 854);
makeString(540, 960);
makeString(600, 1024);
makeString(720, 1184);
makeString(720, 1196);
makeString(720, 1280);
makeString(768, 1024);
makeString(800, 1280);
makeString(1080, 1812);
makeString(1080, 1920);
makeString(1440, 2560);
}
public static void makeString(int w, int h) {
StringBuffer sb = new StringBuffer();
sb.append("<?xml version=\"1.0\" encoding=\"utf-8\"?>\n");
sb.append("<resources>");
float cellw = w / dw;
for (int i = 1; i < dw; i++) {
sb.append(WTemplate.replace("{0}", i + "").replace("{1}", change(cellw * i) + ""));
}
sb.append(WTemplate.replace("{0}", "720").replace("{1}", w + ""));
sb.append("</resources>");
StringBuffer sb2 = new StringBuffer();
sb2.append("<?xml version=\"1.0\" encoding=\"utf-8\"?>\n");
sb2.append("<resources>");
float cellh = h / dh;
for (int i = 1; i < dh; i++) {
sb2.append(HTemplate.replace("{0}", i + "").replace("{1}", change(cellh * i) + ""));
}
sb2.append(HTemplate.replace("{0}", "1280").replace("{1}", h + ""));
sb2.append("</resources>");
String path = rootPath.replace("{0}", h + "").replace("{1}", w + "");
File rootFile = new File(path);
if (!rootFile.exists()) {
rootFile.mkdirs();
}
File layxFile = new File(path + "lay_x.xml");
File layyFile = new File(path + "lay_y.xml");
try {
PrintWriter pw = new PrintWriter(new FileOutputStream(layxFile));
pw.print(sb.toString());
pw.close();
pw = new PrintWriter(new FileOutputStream(layyFile));
pw.print(sb2.toString());
pw.close();
} catch (FileNotFoundException e) {
e.printStackTrace();
}
}
public static float change(float a) {
int temp = (int) (a * 100);
return temp / 100f;
}
}

生成适配文件

环境:MacBook Pro

创建MakeXml.java到某目录下。打开终端,进入到该目录。

  1. 生成class文件

    1
    javac MakeXml.java

    在当前目录生成.class文件

  2. 生成适配文件

    1
    java MakeXml

    在当前目录生成适配文件

使用

将生成的values-XXXxXXX全部拷贝到工程res目录下。

1
2
android:layout_width="@dimen/x24"
android:layout_height="@dimen/y24"

Git指令

发表于 2017-09-19 |

查看用户名及邮箱地址

1
2
$ git config user.name
$ git config user.email

修改用户名及邮箱地址

1
2
$ git config --global user.name "用户名"
$ git config --global user.email "邮箱地址"

即拿即用一Android文件存取

发表于 2017-09-15 |
  • 写文件
  • 读文件
  • Assets文件读取
  • Bitmap保存
  • 文件删除

写文件

1
2
3
4
5
6
7
8
9
10
11
12
13
14
15
16
17
18
19
20
21
22
23
24
25
26
27
28
29
30
31
32
33
34
35
36
37
38
39
/**
* 写文件
*
* @param filePath 文件绝对路径
* @param content 写入内容
* @return 写入是否成功
*/
public static boolean writeFile(String filePath, String content) {
FileOutputStream fileOutputStream = null;
BufferedOutputStream bufferedOutputStream = null;
try {
File file = new File(filePath);
if (file.createNewFile()) {
fileOutputStream = new FileOutputStream(filePath);
bufferedOutputStream = new BufferedOutputStream(fileOutputStream);
bufferedOutputStream.write(content.getBytes("UTF-8"));
bufferedOutputStream.flush();
return true;
}
} catch (IOException e) {
e.printStackTrace();
} finally {
if (null != fileOutputStream) {
try {
fileOutputStream.close();
} catch (IOException e) {
e.printStackTrace();
}
}
if (null != bufferedOutputStream) {
try {
bufferedOutputStream.close();
} catch (IOException e) {
e.printStackTrace();
}
}
}
return false;
}

读文件

1
2
3
4
5
6
7
8
9
10
11
12
13
14
15
16
17
18
19
20
21
22
23
24
25
26
27
28
29
30
31
32
33
34
35
36
37
38
39
40
41
42
43
44
45
46
47
48
49
50
51
52
53
54
/**
* 读文件
*
* @param filePath 文件路径
* @return 文件内容
*/
public static String readFile(String filePath) {
StringBuilder stringBuffer = new StringBuilder();
File file = new File(filePath);
if (file.exists()) {
FileInputStream fileInputStream = null;
InputStreamReader inputStreamReader = null;
BufferedReader bufferedReader = null;
try {
fileInputStream = new FileInputStream(file);
inputStreamReader = new InputStreamReader(fileInputStream, "UTF-8");
bufferedReader = new BufferedReader(inputStreamReader);
String mimeTypeLine;
while ((mimeTypeLine = bufferedReader.readLine()) != null) {
stringBuffer.append(mimeTypeLine);
}
} catch (IOException e) {
e.printStackTrace();
} finally {
if (null != fileInputStream) {
try {
fileInputStream.close();
} catch (IOException e) {
e.printStackTrace();
}
}
if (null != inputStreamReader) {
try {
inputStreamReader.close();
} catch (IOException e) {
e.printStackTrace();
}
}
if (null != bufferedReader) {
try {
bufferedReader.close();
} catch (IOException e) {
e.printStackTrace();
}
}
}
}
return stringBuffer.toString();
}

Assets文件读取

1
2
3
4
5
6
7
8
9
10
11
12
13
14
15
16
17
18
19
20
21
22
23
24
25
26
27
28
29
30
31
32
33
34
35
36
37
38
39
40
41
42
43
44
45
46
47
48
49
/**
* 读取 Assets 文件
*
* @param context context
* @param filePath 文件路径
* @return 文件内容
*/
public static String readAssetsFile(Context context, String filePath) {
StringBuilder stringBuilder = new StringBuilder();
InputStream inputStream = null;
InputStreamReader inputStreamReader = null;
BufferedReader bufferedReader = null;
try {
inputStream = context.getAssets().open(filePath);
inputStreamReader = new InputStreamReader(inputStream, "UTF-8");
bufferedReader = new BufferedReader(inputStreamReader);
String mimeTypeLine;
while ((mimeTypeLine = bufferedReader.readLine()) != null) {
stringBuilder.append(mimeTypeLine)/*.append("\n")*/;
}
} catch (IOException e) {
e.printStackTrace();
} finally {
if (null != inputStream) {
try {
inputStream.close();
} catch (IOException e) {
e.printStackTrace();
}
}
if (null != inputStreamReader) {
try {
inputStreamReader.close();
} catch (IOException e) {
e.printStackTrace();
}
}
if (null != bufferedReader) {
try {
bufferedReader.close();
} catch (IOException e) {
e.printStackTrace();
}
}
}
return stringBuilder.toString();
}

Bitmap保存

1
2
3
4
5
6
7
8
9
10
11
12
13
14
15
16
17
18
19
20
21
22
23
24
25
26
27
28
29
30
31
32
33
34
35
/**
* 保存Bitmap到本地
*
* @param bitmap Bitmap
* @param dir 保存路径
* @param fileName 保存的文件名
* @return 保存是否成功
*/
public static boolean saveBitmap(Bitmap bitmap, String dir, String fileName) {
FileOutputStream fileOutputStream = null;
try {
File fileDir = new File(dir);
if (fileDir.exists() || fileDir.mkdirs()) {
// 文件存在
File file = new File(dir + "/" + fileName);
if (file.createNewFile()) {
fileOutputStream = new FileOutputStream(file);
bitmap.compress(Bitmap.CompressFormat.PNG, 100, fileOutputStream);
fileOutputStream.flush();
}
}
} catch (IOException e) {
e.printStackTrace();
return false;
} finally {
if (null != fileOutputStream) {
try {
fileOutputStream.close();
} catch (IOException e) {
e.printStackTrace();
}
}
}
return true;
}

文件删除

1
2
3
4
5
6
7
8
9
10
/**
* 删除文件
*
* @param filePath 文件路径
* @return 删除是否成功
*/
public static boolean deleteFile(String filePath) {
File file = new File(filePath);
return file.exists() && file.delete();
}

Android AES 加密、解密

发表于 2017-08-04 |

AES加密介绍

ASE 加密、解密的关键在于秘钥、只有使用加密时使用的秘钥,才可以解密。

生成秘钥的代码网上一大堆,下面的代码可生成一个秘钥

1
2
3
4
5
6
7
8
9
10
private SecretKey generateKey(String seed) throws Exception {
// 获取秘钥生成器
KeyGenerator keyGenerator = KeyGenerator.getInstance("AES");
// 通过种子初始化
SecureRandom secureRandom = new SecureRandom();
secureRandom.setSeed(seed.getBytes("UTF-8"));
keyGenerator.init(128, secureRandom);
// 生成秘钥并返回
return keyGenerator.generateKey();
}

然后使用秘钥进行加密

1
2
3
4
5
6
7
8
9
10
11
12
private byte[] encrypt(String content, SecretKey secretKey) throws Exception {
// 秘钥
byte[] enCodeFormat = secretKey.getEncoded();
// 创建AES秘钥
SecretKeySpec key = new SecretKeySpec(enCodeFormat, "AES");
// 创建密码器
Cipher cipher = Cipher.getInstance("AES");
// 初始化加密器
cipher.init(Cipher.ENCRYPT_MODE, key);
// 加密
return cipher.doFinal(content.getBytes("UTF-8"));
}

解密

1
2
3
4
5
6
7
8
9
10
11
12
private byte[] decrypt(byte[] content, SecretKey secretKey) throws Exception {
// 秘钥
byte[] enCodeFormat = secretKey.getEncoded();
// 创建AES秘钥
SecretKeySpec key = new SecretKeySpec(enCodeFormat, "AES");
// 创建密码器
Cipher cipher = Cipher.getInstance("AES");
// 初始化解密器
cipher.init(Cipher.DECRYPT_MODE, key);
// 解密
return cipher.doFinal(content);
}

通常,如果加密和解密都是在同一个平台,比较简单,我们生成一个秘钥以后,将秘钥保存到本地,解密的时候直接获取本地的秘钥来解密就可以了,通常的使用场景为本地将xxx文件加密后上传保存或备份,需要的时候,下载再解密。这样上传的文件比较安全。

看上去很完美,下面问题来了,上述生产秘钥的方法,每次执行生成的秘钥都是不一样的。也就是说,加密时的秘钥如果没有保存到本地,解密的时候再次调用上述方法生成一个秘钥,那么将无法解密。

解决办法也有,使用如下方式生成秘钥,只要种子一样,生成的秘钥就是一样的。

1
2
3
4
5
6
7
8
9
10
private SecretKey generateKey(String seed) throws Exception {
// 获取秘钥生成器
KeyGenerator keyGenerator = KeyGenerator.getInstance("AES");
// 通过种子初始化
SecureRandom secureRandom = SecureRandom.getInstance("SHA1PRNG", "Crypto");
secureRandom.setSeed(seed.getBytes("UTF-8"));
keyGenerator.init(128, secureRandom);
// 生成秘钥并返回
return keyGenerator.generateKey();
}

但是Android N(7.0)以后将不再支持,移除了Crypto。

1
2
3
4
5
6
7
8
9
E/System: ********** PLEASE READ ************
E/System: *
E/System: * New versions of the Android SDK no longer support the Crypto provider.
E/System: * If your app was relying on setSeed() to derive keys from strings, you
E/System: * should switch to using SecretKeySpec to load raw key bytes directly OR
E/System: * use a real key derivation function (KDF). See advice here :
E/System: * http://android-developers.blogspot.com/2016/06/security-crypto-provider-deprecated-in.html
E/System: ***********************************
W/System.err: java.security.NoSuchProviderException: no such provider: Crypto

Google也对应给出了解决方案,详见 Security “Crypto” provider deprecated in Android N

下面介绍另一种解决方案,我们不用种子生成秘钥,直接将password作为秘钥。

关于Android和IOS的同步问题,小伙伴也可以借鉴 AES加密 - iOS与Java的同步实现

如下方法 Android测试可行,IOS如果有小伙测试有问题也可以反馈给我。

加密

1
2
3
4
5
6
7
8
9
10
private byte[] encrypt(String content, String password) throws Exception {
// 创建AES秘钥
SecretKeySpec key = new SecretKeySpec(password.getBytes(), "AES/CBC/PKCS5PADDING");
// 创建密码器
Cipher cipher = Cipher.getInstance("AES");
// 初始化加密器
cipher.init(Cipher.ENCRYPT_MODE, key);
// 加密
return cipher.doFinal(content.getBytes("UTF-8"));
}

解密

1
2
3
4
5
6
7
8
9
10
private byte[] decrypt(byte[] content, String password) throws Exception {
// 创建AES秘钥
SecretKeySpec key = new SecretKeySpec(password.getBytes(), "AES/CBC/PKCS5PADDING");
// 创建密码器
Cipher cipher = Cipher.getInstance("AES");
// 初始化解密器
cipher.init(Cipher.DECRYPT_MODE, key);
// 解密
return cipher.doFinal(content);
}

注意:必须必须要注意的是,这里的password的长度,必须为128或192或256bits.也就是16或24或32byte。否则会报出如下错误:

1
com.android.org.bouncycastle.jcajce.provider.symmetric.util.BaseBlockCipher$1: Key length not 128/192/256 bits.

至于数字、字母、中文都各自占几个字节,相信小伙伴的都是了解的,就不废话了。
也可以byte[] password = new byte[16/24/32];

最后:至于最开始提到生成秘钥的方法,为什么种子相同,所生成的秘钥不同,还没看具体实现。有知道的小伙伴还请先指点一二。

Android APK添加系统签名

发表于 2017-04-05 |

转载请说明出处!
作者:kqw攻城狮
出处:个人站 | CSDN


将应用设置为系统级应用。可以调用系统级别API。

下载 签名文件

在AndroidManifest.xml中添加sharedUserId 为 android.uid.system,设置应用为系统级。

1
2
3
4
5
6
<?xml version="1.0" encoding="utf-8"?>
<manifest xmlns:android="http://schemas.android.com/apk/res/android"
package="……"
android:sharedUserId="android.uid.system">
……
</manifest>

生成APK

此时生成的APK是无法安装并运行的,因为在上一步已经设置了应用为系统级应用,但是还并没有添加系统签名。

解压下载好的签名文件并添加系统签名

1
java -jar signapk.jar platform.x509.pem platform.pk8 上一步生成的未添加系统签名的APK文件.apk 要生成的签名文件.apk

Android蓝牙通信——AndroidBluetoothManager

发表于 2017-03-16 | 分类于 开源 |

转载请说明出处!
作者:kqw攻城狮
出处:个人站 | CSDN


To get a Git project into your build:

Step 1. Add the JitPack repository to your build file

Add it in your root build.gradle at the end of repositories:

1
2
3
4
5
6
allprojects {
repositories {
...
maven { url 'https://jitpack.io' }
}
}

Step 2. Add the dependency

1
2
3
dependencies {
compile 'com.github.kongqw:AndroidBluetoothManager:1.0.0'
}

AndroidBluetoothManager

效果图

这里写图片描述

PNG

GIF

基础功能

添加权限

1
2
3
4
<uses-permission android:name="android.permission.BLUETOOTH" />
<uses-permission android:name="android.permission.BLUETOOTH_ADMIN" />
<uses-permission android:name="android.permission.ACCESS_COARSE_LOCATION" />
<uses-permission android:name="android.permission.ACCESS_FINE_LOCATION" />

初始化

1
mBluetoothManager = new BluetoothManager();

打开蓝牙

1
mBluetoothManager.openBluetooth();

关闭蓝牙

1
mBluetoothManager.closeBluetooth();

添加蓝牙开关状态的监听

1
mBluetoothManager.setOnBluetoothStateListener(this);
1
2
3
4
5
6
7
8
9
10
11
12
13
14
15
16
17
18
19
20
21
22
23
24
25
26
27
28
29
30
31
/**
* 正在关闭蓝牙的回调
*/
@Override
public void onBluetoothStateTurningOff() {
// TODO
}
/**
* 蓝牙关闭的回调
*/
@Override
public void onBluetoothStateOff() {
// TODO
}
/**
* 正在打开蓝牙的回调
*/
@Override
public void onBluetoothStateTurningOn() {
// TODO
}
/**
* 蓝牙打开的回调
*/
@Override
public void onBluetoothStateOn() {
// TODO
}

移除蓝牙开关状态的监听

1
mBluetoothManager.removeOnBluetoothStateListener();

设置蓝牙可见

1
startActivity(mBluetoothManager.getDurationIntent(0));

获取蓝牙名称

1
mBluetoothManager.getName()

修改蓝牙名称

1
mBluetoothManager.setName(newName);

扫描附近的蓝牙设备

1
mBluetoothManager.discovery();

添加扫描蓝牙设备的监听

1
mBluetoothManager.setOnDiscoveryDeviceListener(this);
1
2
3
4
5
6
7
8
9
10
11
12
13
14
15
16
17
18
19
20
21
22
23
24
25
/**
* 开始扫描附近蓝牙设备的回调
*/
@Override
public void onDiscoveryDeviceStarted() {
// TODO
}
/**
* 扫描到附近蓝牙设备的回调
*
* @param device 蓝牙设备
*/
@Override
public void onDiscoveryDeviceFound(BluetoothDevice device) {
// TODO
}
/**
* 扫描附近蓝牙设备完成的回调
*/
@Override
public void onDiscoveryDeviceFinished() {
// TODO
}

移除扫描蓝牙设备的监听

1
mBluetoothManager.removeOnDiscoveryDeviceListener();

服务端

初始化

1
2
3
4
5
6
7
8
9
10
11
12
13
14
mBluetoothService = new BluetoothService() {
@Override
protected UUID onSecureUuid() {
// TODO 设置自己的UUID
return UUID_SECURE;
}
@Override
protected UUID onInsecureUuid() {
// TODO 设置自己的UUID
return UUID_INSECURE;
}
};

等待客户端连接

1
mBluetoothService.start();

断开连接/释放资源

1
mBluetoothService.stop();

添加蓝牙连接的监听

1
2
3
4
5
6
7
8
9
10
11
12
13
14
15
16
17
18
19
20
21
mBluetoothService.setOnServiceConnectListener(new OnServiceConnectListener() {
@Override
public void onConnectListening() {
// TODO
}
@Override
public void onConnectSuccess(BluetoothDevice device) {
// TODO
}
@Override
public void onConnectFail(Exception e) {
// TODO
}
@Override
public void onConnectLost(Exception e) {
// TODO
}
});

发送消息

1
mBluetoothService.send(chatText);

添加消息收发的监听

1
mBluetoothClient.setOnMessageListener(this);
1
2
3
4
5
6
7
8
9
10
11
12
13
14
15
16
17
18
19
/**
* 蓝牙发送了消息
*
* @param message 发送的消息
*/
@Override
public void onSend(String message) {
// TODO
}
/**
* 蓝牙接收到消息
*
* @param message 接收的消息
*/
@Override
public void onRead(String message) {
// TODO
}

客户端

初始化

1
2
3
4
5
6
7
8
9
10
11
12
13
mBluetoothClient = new BluetoothClient() {
@Override
protected UUID onSecureUuid() {
// TODO 设置自己的UUID
return UUID_SECURE;
}
@Override
protected UUID onInsecureUuid() {
// TODO 设置自己的UUID
return UUID_INSECURE;
}
};

蓝牙连接(安全)

1
mBluetoothClient.connect(mBluetoothDevice, true);

蓝牙连接(不安全)

1
mBluetoothClient.connect(mBluetoothDevice, false);

断开连接/释放资源

1
mBluetoothClient.stop();

添加蓝牙连接的监听

1
2
3
4
5
6
7
8
9
10
11
12
13
14
15
16
17
18
19
20
21
mBluetoothClient.setOnClientConnectListener(new OnClientConnectListener() {
@Override
public void onConnecting() {
// TODO
}
@Override
public void onConnectSuccess(BluetoothDevice device) {
// TODO
}
@Override
public void onConnectFail(Exception e) {
// TODO
}
@Override
public void onConnectLost(Exception e) {
// TODO
}
});

发送消息

1
mBluetoothClient.send(chatText);

添加消息收发的监听

1
mBluetoothClient.setOnMessageListener(this);
1
2
3
4
5
6
7
8
9
10
11
12
13
14
15
16
17
18
19
/**
* 蓝牙发送了消息
*
* @param message 发送的消息
*/
@Override
public void onSend(String message) {
// TODO
}
/**
* 蓝牙接收到消息
*
* @param message 接收的消息
*/
@Override
public void onRead(String message) {
// TODO
}

Android自定义雷达扫描控件

发表于 2017-03-10 | 分类于 开源 |

转载请说明出处!
作者:kqw攻城狮
出处:个人站 | CSDN


Android 雷达扫描控件

To get a Git project into your build:

Step 1. Add the JitPack repository to your build file

Add it in your root build.gradle at the end of repositories:

1
2
3
4
5
6
allprojects {
repositories {
...
maven { url 'https://jitpack.io' }
}
}

Step 2. Add the dependency

1
2
3
dependencies {
compile 'com.github.kongqw:AndroidRadarScanView:1.0.1'
}

源码:AndroidRadarScanView

效果图

AndroidRadarScanView

AndroidRadarScanView

XML

1
2
3
4
<com.kongqw.radarscanviewlibrary.RadarScanView
android:id="@+id/radarScanView"
android:layout_width="match_parent"
android:layout_height="match_parent" />

初始化

1
radarScanView = (RadarScanView) findViewById(R.id.radarScanView);

设置属性

XML

1
xmlns:app="http://schemas.android.com/apk/res-auto"
1
2
3
4
5
6
7
8
9
10
11
12
<com.kongqw.radarscanviewlibrary.RadarScanView
android:id="@+id/radarScanView"
android:layout_width="match_parent"
android:layout_height="match_parent"
android:layout_centerInParent="true"
app:radarBackgroundColor="@color/colorAccent"
app:radarBackgroundLinesColor="@color/colorPrimaryDark"
app:radarBackgroundLinesNumber="3"
app:radarBackgroundLinesWidth="5.5"
app:radarScanAlpha="0x33"
app:radarScanColor="#FF000000"
app:radarScanTime="5000" />
属性 类型 描述
radarScanTime integer 设置雷达扫描一圈时间
radarBackgroundLinesNumber integer 设置雷达背景圆圈数量
radarBackgroundLinesWidth float 设置雷达背景圆圈宽度
radarBackgroundLinesColor color 设置雷达背景圆圈颜色
radarBackgroundColor color 设置雷达背景颜色
radarScanColor color 设置雷达扫描颜色
radarScanAlpha integer 设置雷达扫描透明度

Java

1
2
3
4
5
6
7
8
9
10
11
12
13
14
15
radarScanView
// 设置雷达扫描一圈时间
.setRadarScanTime(2000)
// 设置雷达背景颜色
.setRadarBackgroundColor(Color.WHITE)
// 设置雷达背景圆圈数量
.setRadarBackgroundLinesNumber(4)
// 设置雷达背景圆圈宽度
.setRadarBackgroundLinesWidth(2)
// 设置雷达背景圆圈颜色
.setRadarBackgroundLinesColor(Color.GRAY)
// 设置雷达扫描颜色
.setRadarScanColor(0xFFAAAAAA)
// 设置雷达扫描透明度
.setRadarScanAlpha(0xAA);

备用

手动开始扫描

1
radarScanView.startScan();

手动停止扫描

1
radarScanView.stopScan();
12…6
kongqw

kongqw

Android Developer

54 日志
4 分类
25 标签
GitHub CSDN
Links
  • 干货集中营
  • 讯飞开放平台
  • 环信
  • 百度统计
  • DISQUS评论
  • BTC Wallet
  • OKCoin中国站
  • OKCoin国际站
  • BTC.com
© 2015 - 2018 kongqw
由 Hexo 强力驱动
主题 - NexT.Pisces